Bioverter's composting handbook
How to make the best compost and use it effectively
Basics
The basics of home composting are:
- Keep feeding a balanced mix of organic wastes
- Ensuring there's air flow and warmth
With Bioverter, you can simply place your balanced mix inside it, put the lid on, and Bioverter will take care of the waste.
- A balanced diet for composting
-
All successful composting start with balanced wastes. The traditional methods require you to layer carbon and nitrogen wastes alternately.
Luckily, a good mix of kitchen scraps has carbon and nitrogen macronutrients in balance. It also has water, which is another vital ingredient. This means assorted kitchen wastes make a good regular balanced feed for Bioverter.
Back to top ↑ - Bioverter provides air and warmth
-
Air is a well-known composting requirement. Kitchen scraps need a lot more air than garden waste, and can become smelly mush in a compost system that can’t provide enough air.
Warmth is often overlooked as a requirement. Composting slows down when your wastes go cold.
Designed to meet the air and warmth needs, Bioverter readily converts kitchen waste into compost rich in many and varied nutrients. Oxygen is fully supplied to save you the hard work of having to aerate by mixing, and it is insulated to help your waste stay hot for faster composting.
Back to top ↑
Feeding
Once you are familiar with how to balance wastes for composting, you’ll find that Bioverter can be fed mainly kitchen scraps with a weekly carbon supplement.
- Balance your kitchen scraps
-
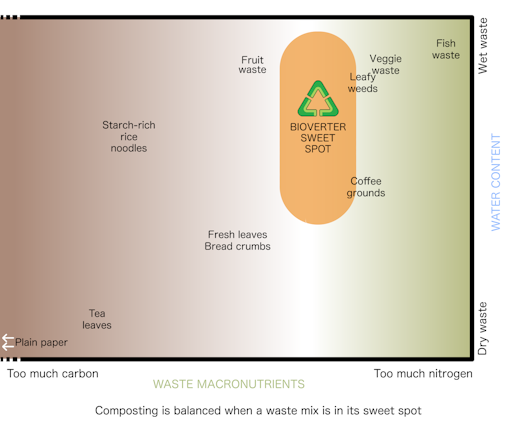
A mix of vegetable and fruit scraps is typically balanced for composting. In other words, the mix is in the compost sweet spot where nitrogen and carbon macronutrients are in balance, together with water.
If nitrogen waste (e.g. coffee grounds and leafy weeds) is included, then your composite would require a balancing input of carbon waste (e.g. starch-rich rice or pasta, bread and fresh leaves).
We found that a mix of assorted (cooked or raw) scraps is generally compostable provided that your feed has variety rather than being of one dominant type, e.g. mostly veggie scraps. Ensure none of your waste is larger than 3cm in size for a thorough use of all waste parts.
Exclude tough bits like corn cobs, pips (avocado and mango), fruit stones (peach and nectarine) and nut shells (walnut). Discard the watery parts of cooked waste.
TipOur extensive trials on getting the balance have shown that feeding a little carbon at least once a week to your regular feeds helps to keep Bioverter going smoothly.
 Back to top ↑
- Feed daily or days apart with a caddy
-
Bioverter can be fed either daily or a few days apart with what you have gathered in a kitchen caddy.
Spread your feed evenly and fill in the corners. Don’t squash the wastes.
Your scraps may differ from day to day. Daily fluctuations in the type and amount is fine as long as there is a good mix of scraps in a week’s worth of feeding. This means for example, that you could add extra vegetable scraps one day and more fruit scraps later in the week without disrupting Bioverter.
Back to top ↑ - How much can I add in one go?
-
Bioverter prefers to be fed regularly rather than all at once. Periods of feast and famine have adverse effects on its health, just like the impact on our health.
Feed Bioverter at least once a week if you are using a kitchen caddy. On the other hand, avoid adding more than one caddy’s worth in one go!
Back to top ↑TipDon’t overload your Bioverter, so limit each feed to 8 litres.
- Feed a little carbon waste
-
Bioverter takes kitchen scraps as its main feed, but to turn them properly into rich compost, it requires you to add a small amount of carbon waste such as:
- fresh leafy plant trimmings or tip pruning (without woody parts)
- garden mulch that breaks down easily (lucerne mulch and pea straw)
- shredded or mowed autumn leaves (nothing waxy)
- paper towel (food stain is acceptable but cleaning product contamination is unacceptable)
If your routine is adding a plateful of kitchen scraps directly into Bioverter, add the carbon waste after every third or fourth plate of scraps.
With a kitchen caddy, add the carbon waste after emptying a fully filled unit, or after the second half filled caddy.
The amount to add depends on which carbon waste you use:
- 2cm layer of fresh leafy plant trimmings or tip pruning
- 1cm (maximum thickness) layer of lucerne mulch or pea straw
- a fine layer of shredded autumn leaves (barely covering kitchen scraps)
- 2 sheets of paper towel (could already be with your kitchen scraps)
Back to top ↑TipAdd less carbon waste when there is an abnormally large amount of starchy scraps (bread, pizza crust, pasta, potato, noodle and rice) in your total feed.
- Use protein-rich scraps in moderation
-
Leftovers containing protein-rich scraps can be used to feed Bioverter with care. Sort them as follows:
- Keep out of Bioverter: bones, fatty or oily remains and watery sauces.
- Cut into tiny pieces: meat, poultry, fish, and dairy products. Spread these pieces of protein food thinly amongst other (low protein) scraps, helping to limit the amounts in each feed.
- Divide the size of remaining waste to less than 3 cm, giving microbes quicker access to all of the waste.
Reminder for startup composting: We recommend excluding protein-rich scraps from your feed during the first 3 months of startup composting. Wait until you have completed the switch from startup to routine composting before you add protein food.
Back to top ↑ - Is there anything I shouldn't compost?
-
Anything that take a long time to break down, or turns into something undesirable. For example: oil, fat, bones, large fruit seeds (peach, nectarine, avocado, mango), walnut shells, woody plant parts, dry leaves, seeded weeds, diseased plants, and dog/cat faeces. Some of these - like walnut shells, woody materials and dry leaves - can be used as garden mulch but the rest should be discarded.
Don’t put in disposable bags, bin liners and materials marked as degradable. They break down only when sent to an industrial facility which can sustain temperatures over 60C.
Back to top ↑
Harvesting
Bioverter transforms waste into two valuable outputs, which drop into convenient pull-out collectors for harvesting.
Bioverter also separates its harvests, which is handy as the collectors fill at different rates. Fresh compost is collected in the upper Basket, while compost juice flows down to the liquid Tray below.
- Harvest and use compost juice
-
Compost juice is Bioverter’s liquid harvest. It first appears as a brown liquid in the bottom Tray not long after you start feeding Bioverter, and darkens to a coffee colour soon after.
You can harvest and use dark compost juice easily:
- Pull out your liquid Tray and pour the juice into a watering can.
- Dilute the juice for immediate use - add water to top up a standard size watering can, or use a similar volume of water and juice for a small watering can.
- Water plants, herbs and veggies with the diluted juice as part of your watering routine. Watering resting garden beds can improve soil health.
Fresh juice can be harvested weekly with regular inputs of kitchen waste. Its usefulness is undervalued because traditional systems aren’t set up to make and collect it.
Compost juice is enriched with soluble nutrients, humus substances (that gives it the dark colour) and probiotics - microbes that are beneficial to your soil. Diluting the juice doesn’t reduce its effectiveness, but actually assists with a quick and easy delivery of its goodness to more parts of your garden.
Bioverter’s pioneering design ensures goodness in your wastes end up in either fresh compost or compost juice.
Back to top ↑ - When and how to harvest compost
-
Bioverter takes the guesswork out of when to harvest. Compost drops into the collection Basket once it is ready for harvest. Jiggle the basket to have a feel of the amount of compost it has collected.
To take out compost:
- Slide out the bottom liquid Tray to access the Basket - see Tip 1.
- Pull out the Basket carefully to harvest your compost - see Tip 2.
- Put back the emptied Basket - refer to our cleaning tips if it doesn’t go right in.
- Return the liquid Tray to resume collecting fresh compost and compost juice.
Tip 1: the liquid Tray glides on top of a perforated base plate. You can help to keep the base plate clean by covering it with a piece of cardboard or cloth the size of the plate during compost harvesting.
Tip 2: the descent of compost into the Basket is irregular. Some might hang like stalactites and make it hard to pull out the Basket. You can cut them off with a thin implement, moving it from the sides to the centre. A spatula with a blade 30cm long is handy.
Reminder: Freshly harvested compost has the potential to inhibit rather than promote plant growth. We recommend resting your harvest to get enhanced compost benefits.
Back to top ↑ - Ensure your collectors run smoothly
-
The liquid Tray collects compost juice and the Basket collects fresh compost. They are both pull-out collectors, sliding in and out smoothly when the collection area is clean.
The bottom Tray glides on top of a perforated base plate. You pull it out to harvest compost juice and slide the emptied Tray back into position. The Basket is left alone above the Tray when harvesting juice, and it stops compost matter falling onto the base plate when the Tray is taken out.
During compost harvesting, watch for compost matter falling into the collection area. Covering the perforated base plate with a piece of cardboard or cloth the size of the plate keeps it clean after pulling out the bottom Tray. You can now pull out the Basket to harvest compost.
The Basket sits on runners. Bits of compost can fall onto the runners during harvesting. Clear the runners on the two side walls and the rear wall, to ensure the emptied Basket can slide freely and go right to the back. The liquid Tray will now fit snugly in position.
Back to top ↑
Optimising
Bioverter unlocks the goodness in your waste and captures all useful matter as dark compost and juice in separate pull-out collectors.
You can utilise the richness in compost juice right away after harvest. With dark compost, use our tips to get noticeably better results.
- Get extra benefits out of fresh compost
-
By the time your compost descends into the collection Basket, it is unappealing to pests and pets as a potential source of food. However, its nutrients are initially unavailable to plants.
Leave your harvest to rest in a sheltered spot and its nutrients change into a form that plants can use readily. What’s more, your crumbly end-product is soil-like and gives you additional benefits:
- it is nutrient dense and works like a slow-release fertiliser
- its ability to retain water makes your soil more drought resistant
- it promotes good soil microbes to help suppress pests and diseases
We suggest three simple ways to rest your harvest so that you can choose an outcome that suits you - create fresh topsoil, soil superfood or enriched potting mix. Resting cannot be hurried, but is necessary to unlock the full potential of your compost.
Back to top ↑ - Create new topsoil wherever you want
-
Leaving fresh compost to rest on soil can help you add a layer of rich topsoil near an established plant, under the canopy of a young tree, or in a garden bed.
Select where you want to nourish and improve the soil:
- Scoop out a shallow depression or enclose an area with makeshift timber, brick or other type of walls
- Spread your compost harvest and cover it with standard garden mulch
- Use mesh or bird netting to stop birds digging for earthworms attracted to the compost
- Let your fresh compost evolve naturally into its final soil-like form
This simple resting method unleashes the full spectrum of benefits for successful gardening where you want.
Back to top ↑TipDon’t dig fresh compost into soil because it’ll draw oxygen and nitrogen away from your plants.
- Make soil superfood in a worm pop-up
-
You can rest fresh compost specifically to obtain additional benefits through garden earthworms and worm casts.
Set up a worm pop-up with a loose-fitting lid in a shaded spot:
- Use a plant pot, bottomless bin or old worm farm tray
- Bury its base so earthworms can move in and out safely
- Spread your compost harvest and cover with a damp cloth
- Put on the lid but add water to keep the contents damp
- Earthworms burrow their way to a bumper food supply
- Top up with fresh compost to build earthworm numbers
- Let your last addition rest for 8 weeks
Earthworms multiply and produce nutritious worm casts, while natural microbes turn uneaten harvest into crumbly soil-like compost. The overall mix in your worm pop-up combine to form soil superfood - a wonderful concoction that help you grow healthy plants and boost your outputs of flowers, herbs and vegetables.
Back to top ↑ - Enrich potting mix with fresh compost
-
Fresh compost can be rested in a plant pot if you don’t have a garden bed. Depending on the amount of compost produced, you could layer consecutive harvests to obtain a pot ready for planting:
- Select a 25 cm or larger pot
- Put potting mix in to a depth of about 5 cm
- Spread your compost harvest on top of the base layer
- Cover the compost with potting mix about 1.5 cm thick
- Dampen this thin cover layer of potting mix
- Place a piece of cloth or some organic mulch to reduce water loss
- Keep the rain and sun out with a lid (e.g. a large pot saucer)
- Position the pot in a shaded location
- Ensure the contents don’t dry out in hot weather
- Remove the piece of cloth to add your next compost harvest
- Repeat steps 4 - 6
After your final input, leave the pot to rest for 2 months before using your enriched potting mix.
Back to top ↑
Startup
Bioverter transforms your waste continuously by using a community of microbes working in complete unison. Your crucial microbes are set up in your unit during the initial startup stage.
- What happens during startup composting?
-
Composting matter piles up while you create teams of microbes to break down assorted kitchen scraps in the pile and unlock all their goodness. The teams expand in diversity and size during startup to build your Bioverter’s microbial backbone.
Startup takes typically 3 months, during which you won’t harvest any solids.
Once the microbial backbone is formed, your Bioverter begins to make harvestable compost routinely. You switch from startup to routine composting with one small change.
Back to top ↑ - How do I kickstart Bioverter?
-
A kickstarter brings helpful microbes to speed up the startup. You can kickstart with a handful of fresh compost or garden soil - just sprinkle it over your first lot of wastes.
Soil from your nature strip is an acceptable kickstarter if you don’t have access to a garden. Bagged compost can supply microbes but most of them may be inactive. You could buy compost starters that contain microbes, or simply allow more time for microbes to build up in your Bioverter.
Back to top ↑ - Changing from startup to routine composting
-
The Basket has a removable piece which is called the Grille in our instruction leaflet. It has two different roles.
During startup, the Grille sits on top of the Basket and functions like a cover - it keeps all waste matter within Bioverter’s insulated space. You would have set this up to get Bioverter going.
Around the 3 month mark after you started to feed Bioverter, you can switch the Grille to its regular position at the base of the Basket:
- take out the liquid Tray to access the Basket - see Tip 1
- pull out the Basket - see Tip 2
- lift the Grille off the top of the Basket and give it a quarter turn
- slide the Grille down to form the base of the Basket
- put the Basket back in position to collect compost from now on - see Tip 3
- slide the liquid Tray into position
Your Bioverter is ready for routine collection of compost juice and fresh compost.
Tip 1: the liquid Tray glides on top of a perforated base plate. You can help to keep the base plate clean by covering it with a piece of cardboard or cloth the size of the plate when switching Grille position.
Tip 2: organic matter has piled up on the Grille during startup. Some may have lodged in its perforations. Use a thin implement to clear the top of the Grille, moving it from the sides to the centre. A spatula with a blade 30cm long can make it easier to pull the Basket out.
Tip 3: to ensure the Basket slides smoothly on runners (on the two side walls and at the rear wall), clear the runners before pushing the Basket right back to begin collecting compost.
Back to top ↑